How to Use Portable Veterinary Ultrasound?
How to Use Veterinary Ultrasound for Animals Pregnancy Checking?
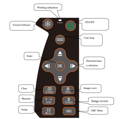
S1 Portable Veterinary Ultrasound Operation Guidence
1. Quick Start Guide
1.Boot the device
Press and hold the soft switch key on the device panel for more than three seconds. The power indicator on
the keyboard lights up, the startup interface appears, and the scan work status is entered later.
2.Set Animal/Body Mark
Select "other set" to switch the animals and set the body mark. S1 Vet Ultrasound supports the scan and measurement of Bovine, Canine, Equine, Ovine, Feline, Swine, Llama.
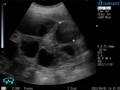
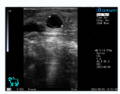
3.Place the probe
For medium animals, apply the gel on the scanning skin, and place the convex probe on the belly of the animal. For large animals, before using the rectal probe, the rectum of the mare/cow/llama is emptied of feces, and the rectal probe is introduced into the rectum with a gloved arm to observe the ovaries, uterus and newly developing embryos therein.
(soybean or castor oil, olive oil, or kitchen detergent instead of the gel.)
4. Unfreeze the screen
Press the Unfreeze button on the left corner of the operation panel to unfreeze the screen before scanning.
5. Adjust monitor
Adjust brightness, contrast, and total gain (GAIN) to match the operator's visual requirements.
When using the machine at a low temperature, please warm the probe for more than 5 minutes before operating.

Schematic diagram of probe position for detecting uterus and ovaries
2. Routine measurement
Press the “Meas” button to enter the normal measurement mode. The default is distance measurement. Use
the ↑, ↓ keys to select the right menu measurement option. Press the “OK” button to enter the measurement state. Move the cursor with the ↑, ↓, ←, → keys to select the measurement starting point.
Press the “OK” button to measure the measurement starting point position, then move the cursor to the measurement end point and press the “OK” button to display the measurement result below the menu on the right side of the screen. Press “Exit” to exit the current measurement item, continue to press ↑, ↓ to select other measurement items.
*All measurement operation must be implemented in a freeze state.
3. Obstetrical Measurement
Press the “OBC” button to enter the obstetric measurement mode. According to the system settings, the corresponding obstetric measurement menu will appear on the right side, and the measurement will be performed according to the conventional measurement method. The measurement result is displayed at the bottom of the right menu. Press “Exit” to exit the current measurement item, continue to press ↑, ↓ to select other measurement items.
4. Distance Measurement
Method of operation:
1. Press the “Dis” button and two measurement cursors appear on the screen.
2. Press the “OK” button to convert the movable measurement cursor.
3. Use the arrow keys to move the measurement cursor to the starting point of the distance to be measured, and then press the "OK" button to determine the starting point of the distance to be measured.
4. Move another cursor to the end of the distance to be measured, press “OK” to complete the measurement and exit.
5. To continue measuring distances, repeat steps 1–4 to measure up to 4 sets of data. The result of the
measurement is displayed on the left side of the screen.
The four sets of data are D1, D2, D3, and D4, respectively, and the unit is mm.
5. Circumference, Area Measurement
The device can measure the circumference and area. Press the “Menu” button and use the arrow keys to select “Circ/Area” to enter the perimeter area measurement status. Method of operation:
1. Press the arrow keys to move the measurement cursor to the measurement start position.
2. Press the “OK” key to confirm the movable measurement cursor.
3. Move the measurement cursor with the arrow keys to display the trace line at the same time. When the direction adjustment is needed, press the “OK” button to change the direction.
4. After the track to be measured is completed, press the “OK” button twice to complete the measurement and exit.
5. To continue measuring the distance, repeat steps 1-4.
The result of the measurement is displayed on the right side of the screen. +C is the current measurement circumference (in mm); +S is the current measurement area (unit: mm2)
6. Cine loop and images saving
The system provides separate storage areas for "cine loop" and "image saving" respectively.
6.1 Image saving
Please confirm that the TF card is correctly inserted into the device before storing the image. After you have a satisfactory image, press the “SAVE” button to save the current image. At the same time, the serial number of the currently stored image is automatically displayed in the lower left corner of the image area.
For example, (T)17010304", press the "OK" button, the image storage is completed, and the serial number disappears. After the image is saved, the system automatically enters the frozen state, and presses the "freeze" button to return to the real-time state.
Note: The “T” on the serial number is the memory card path. The latter is displayed in the order of the
year, month, and day.
6.2 Call of saved image
Press the “Output” button in the live or freeze mode, and the saved image number will appear at the bottom
left of the screen. Press the up and down keys to select the serial number of the stored image, press the “OK” key to confirm the serial number and call up the image. Press the "OK" button again to exit the recall image mode. Press the “Freeze” button to return to the live or freeze mode. To continue to recall other images, repeat the
above operation.
●Note:When an image recall operation is performed on a storage area where no image is stored, the image
cannot be called up.
6.3 Cine loop
After booting into the real-time mode, you must first let the device start the collection of the movie playback graphics, and the acquisition time is about 30 seconds.
1. Then let the device enter freeze mode. Press the “Movie Playback” button to start playback and the image is played back in a loop.
2. Press ← or → key during playback to enter manual playback mode, press ← key to decrease image by
frame; press → key to increase image by frame. Press the “OK” button again to exit the playback mode.
3. Press the ↑ or ↓ button during playback to adjust the playback speed mode.
●Note: After changing the image scanning mode, changing the probe or the display mode, if the cine loop is performed immediately, the playback will not be performed normally. The cine loop operation should be performed after about 30 seconds of normal scanning.
●If you change the probe or change the scanning angle, the number of cine loop frames may change, which is based on the data displayed at the bottom of the screen.
7. Shutdown And Charging
Press and hold the soft switch button on the device panel for more than three seconds to shut down. When the device shows that the current battery is low, please charge it in time. When the device is in the charging state, the charging indicator flashes, and the light is always on after charging.
The device is equipped with a screen saver function, and the protection time can be set in the settings. When there is no operation above the settings, the device automatically shuts down.
Note: Please contact the manufacturer when removing or replacing the battery. Tip: If you do not use the device for a long time, it is best to switch the device on and off for more than 4 hours every month; The battery is fully charged and stored.